Gaming on Fedora Kinoite
2024-05-31
4 minutes read
As of June 2024, all is not roses, but it's getting pretty close.
This article serves as a list of all the things I think are vital to have a good experience on Fedora 40 Kinoite, and how to do it.
Preparing your Windows system for dual boot
Skip this if you're not keeping a Windows install as dual boot.
First, you have to decide how much space to dedicate to the Linux partition. It is possible to read data from each os in the other one, for example for documents or a media HDD, but e.g your Steam library can't really overlap. So free up some space, and decide how much you want to dedicate to Linux.

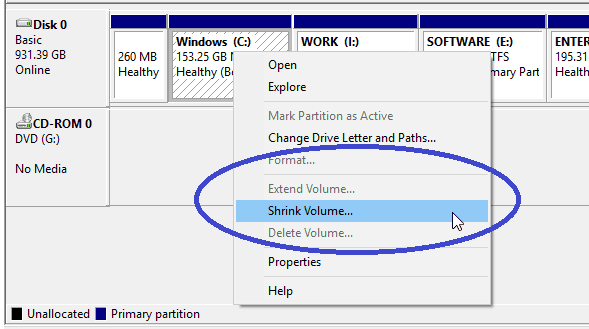
Then, open "Create and format hard disk partitions", find the drive and partition where you freed up space earlier, right click it, and select the option to shrink or resize it. Enter the new size, and apply the changes. You should now have an area marked "free space". Don't create a new partition; the Linux installer will do this itself.
Installing Kinoite
Kinoite can be downloaded here: https://fedoraproject.org/atomic-desktops/kinoite/
This is documented pretty well on the Fedora docs.
I recommend not messing around with manual partitioning, due to the issues described in the docs above. The default options are fine.
If you're keeping a Windows partition around, make sure you don't select an option that overwrites the whole drive, but instead one that adds a partition in the free space you created earlier.
Then complete the installation.
Installing the Nvidia drivers
The first thing you want to do after install is get your video drivers set up. This will require opening a terminal and entering a couple of commands.
At time of writing, the Nvidia 555 drivers are not yet in RPMFusion, and we want those drivers because of something called "Explicit Sync", which makes the whole experience way better. So instead, we'll be installing them from Negativo17's repo. I'll probably update this guide to use RPMFusion once the 555 drivers are available there.
sudo curl https://negativo17.org/repos/fedora-nvidia.repo -O --output-dir /etc/yum.repos.dsudo rpm-ostree install nvidia-driver nvidia-driver-cuda egl-waylandsudo rpm-ostree kargs --append=rd.driver.blacklist=nouveau --append=modprobe.blacklist=nouveau --append=nvidia-drm.modeset=1 --append=nvidia-drm.fbdev=1 --append=nvidia.NVreg_EnableGpuFirmware=0
The way these drivers work, they will take some time to install, as they are essentially compiling a kernel module. This can easily take several minutes.
Once this finishes, reboot for the changes to take effect.
Installing RPMFusion for video codecs and controller support in Steam
Some video codecs are not included in Fedora by default because of licensing issues. To fix this, we need the RPMFusion repositories.
rpm-ostree install \https://mirrors.rpmfusion.org/free/fedora/rpmfusion-free-release-$(rpm -E %fedora).noarch.rpm \https://mirrors.rpmfusion.org/nonfree/fedora/rpmfusion-nonfree-release-$(rpm -E %fedora).noarch.rpmreboot
You then need to change from the versioned repository to the unversioned one. This will come back to bite you if you don't. This is annoying, but just the way it is unfortunately.
rpm-ostree update \--uninstall rpmfusion-free-release \--uninstall rpmfusion-nonfree-release \--install rpmfusion-free-release \--install rpmfusion-nonfree-releasereboot
After this, we can finally get the multimedia packages installed.
rpm-ostree override remove libavcodec-free libavfilter-free libavformat-free libavutil-free libpostproc-free libswresample-free libswscale-free ffmpeg-free libavdevice-free --install ffmpegrpm-ostree install gstreamer1-plugins-bad-free-extras gstreamer1-plugins-bad-freeworld gstreamer1-plugins-ugly gstreamer1-vaapi libva-nvidia-driver
And then a package required for controller support on Steam to work properly:
rpm-ostree install steam-devices
Mangohud
Mangohud is a very nice performance overlay. Honestly, it beats anything I've found for Windows. To configure it, we can use GOverlay, which is a GUI that lets you change what is included in the Mangohud overlay. Both are in the repos, so just install with
rpm-ostree install mangohud goverlay
Reboot
Finally, reboot your system for all of these changes to take effect.
Installing Steam and friends
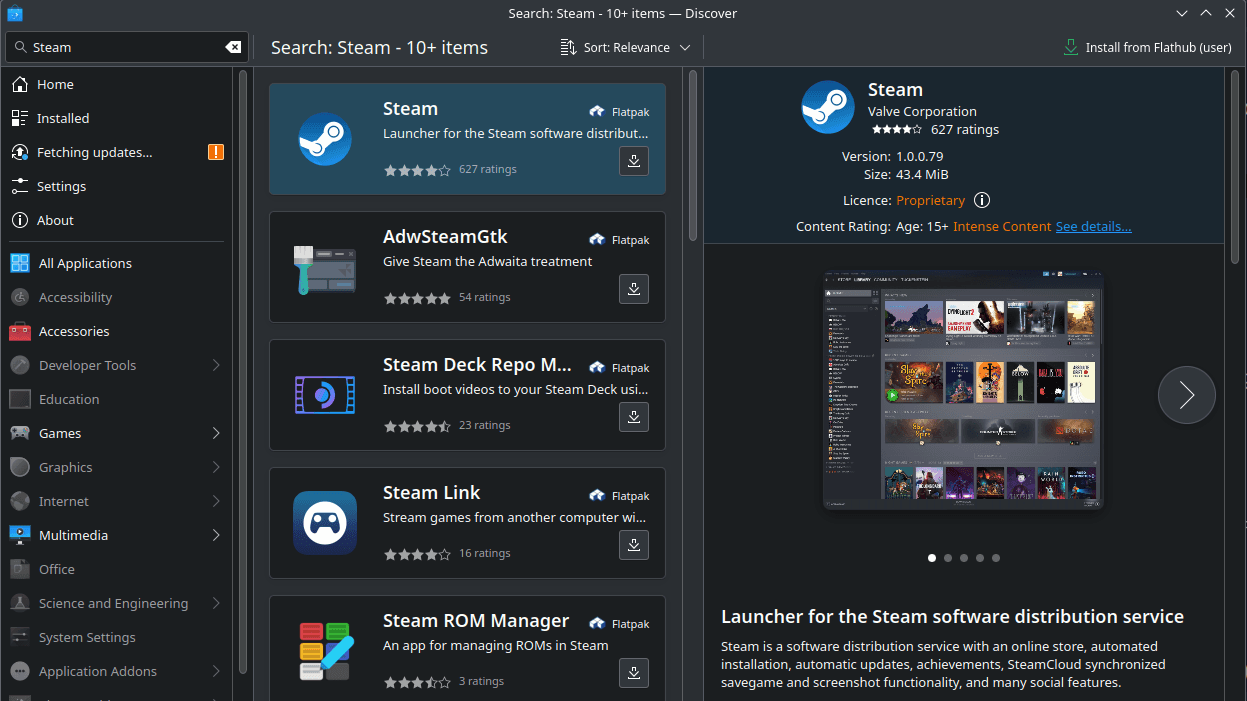
We're going to leave the terminal behind now. From here on we're installing things using FLatpak, instead of as system packages, and we're going to do it through KDE Discover.

There are a few programs that can be found in Discover that you'll want.
- Steam
- ProtoUp-Qt. This is a GUI to manage Proton versions. Often, Steam's default Proton will work wonders, but sometimes you'll want/need to use another Proton version.
- Discord. Here you can also choose Vesktop which actually has working sound when you stream, something Discord just refuses to fix.
- Whatever else you want. Most things are available as Flatpaks these days.
Firefox bug
Right now, Firefox has a bug that makes it crash on Wayland with Nvidia and Explicit Sync, which sucks, because that's exactly the conditions we've just set up. This will likely be fixed in the not too distant future, but for now it is how it is (these are Beta drivers for a reason I guess).
If the link above takes you to a bug that has been closed, or Firefox doesn't crash for you, ignore this whole section.
To fix it, we're going to revert to using the Xwayland mode instead of the native Wayland mode, and then tweak a couple more options to get hardware acceleration working in that mode.
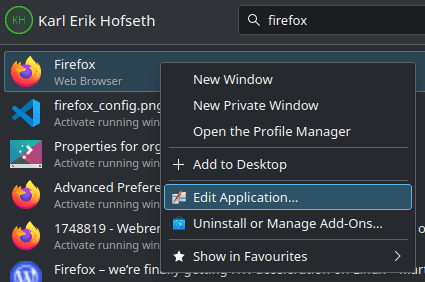
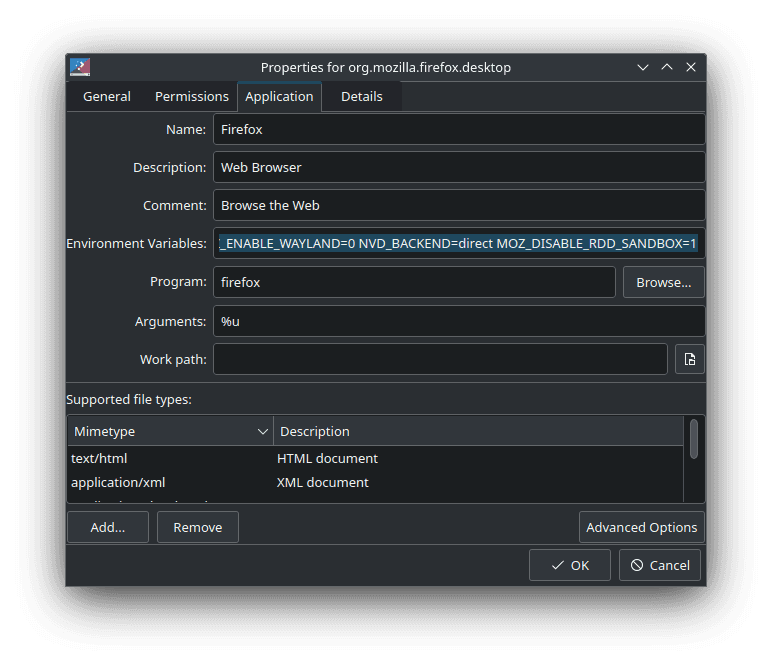
Open the "Start menu" and search for Firefox. Right click it and click "Edit application". Go to the tab "Application" and enter the following into "Environment Variables":
MOZ_ENABLE_WAYLAND=0 NVD_BACKEND=direct MOZ_DISABLE_RDD_SANDBOX=1


Firefox should now stop crashing, but it also will be incredibly laggy because hardware acceleration is disabled.
Open Firefox and enter "about:config" in the address bar (and click through the big warning). Search for "gfx.webrender.all" and set it to "true".

Use Toolbox if you want to do coding
Usually, if you want to code, you may want an environment that is easier to change (easier to e.g install new system packages) than Kinoite and rpm-ostree is designed for. For this you will want to use Toolbox.
Toolbox is a cli tool. So open a terminal (Konsole) window and just do:
karl@fedora-laptop:~$ toolbox enter⬢[karl@toolbox karl]$
Inside this toolbox, you install software using dnf instead of rpm-ostree. VSCode can be installed like this:
sudo rpm --import https://packages.microsoft.com/keys/microsoft.ascecho -e "[code]\nname=Visual Studio Code\nbaseurl=https://packages.microsoft.com/yumrepos/vscode\nenabled=1\ngpgcheck=1\ngpgkey=https://packages.microsoft.com/keys/microsoft.asc" | sudo tee /etc/yum.repos.d/vscode.repo > /dev/nullsudo dnf install code
And you can now open vscode with
code path/to/folder# to open vscode in the current folder:code .
This also means it's easier to install software like python, nodeJS, perl, or what have you, inside this toolbox. Since VSCode is running in the toolbox, it has access to all the software you install in it.
You can also use named toolboxes for different projects. So e.g
toolbox create <name>toolbox enter <name>
to keep that project separate from your other stuff.